Note: As of the July 2013 update to Azure it’s now possible to schedule backups of Azure SQL databases in the Azure Management Portal. See this announcement post for more details
Summary
Using Azure SQL Server hosted on Windows Azure is great option in many ways, but there is no built-in support provided for automating backups of your databases (unlike running SQL Server on an Azure virtual machine where you have access to the full features on SQL Server). This post describes a simple solution we put together in less than 2 days as an internal tool.
Azure SQL Database Service
Windows Azure SQL Database service is a great option for your relational database needs, it gives you most of the features in SQL Server available as a service without you having to worry about managing SQL Server itself or the system it’s running on. Additionally it provides you with a 99.9% monthly SLA and the data stored in the database is replicated synchronously to three different servers within the same Azure data center which gives you a high degree of confidence in the durability of the stored data.
Manual Backups
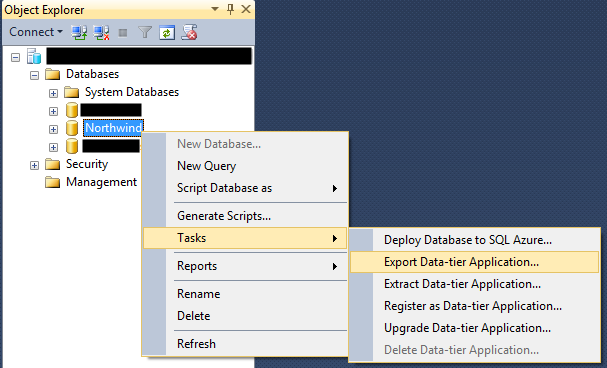
SQL Server Management Studio 2012 provides built-in support for backing up a database to Azure Blob Storage which makes this operation very convenient:
Figure 1 Exporting a database from SQL Server Management Studio
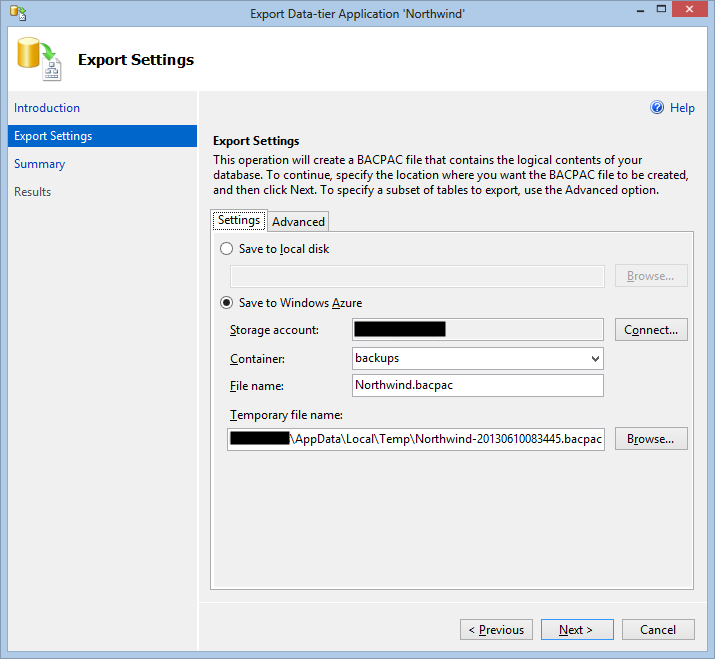
Figure 2 Specifying the Azure Storage account and container for the backup
Just specify the Azure Storage account you want to use to store the backup blob and SQL Server Management Studio takes care of the rest. This is very convenient for a quick, ad-hoc, backup but if you need to do this every night doing it manually gets cumbersome very quickly (even more so if the backup must be done at an inconvenient time).
Automating Backups
As with any other computer-related task that needs to be done more than once, an obvious approach is to automate it so that we know it will be performed the same way every time. For this particular task there are several ways it could be done, but we wanted to also provide a simple UI to let non-developer users define backup jobs and view the results of backup jobs so a combination of an Azure Web Role to provide a management website and an Azure Worker role to do the actual backups fit our needs well.
Backing up SQL Server Programmatically
There are several ways to backup SQL Server databases, but in our case the Data-tier Application functionality in SQL Server met our needs. This functionality is available to .NET languages in the Microsoft.SqlServer.Dac assembly in the form of the Microsoft.SqlServer.Dac.DacServices class.
This class makes it very easy to export a database with the schema and data to a BACPAC file:
var services = new DacServices( connectionString );

services.ExportBacbac( destinationFilePath, databaseName );
As you can see, all you need to provide is a connection string to the SQL Server and then the path of the BACPAC file the database should be exported to and the name of the database to export.
The DacServices class also provides access to the events that happen during the export so progress information can be captured and either displayed or logged.
This works the same regardless of if you’re targeting an on-premises SQL Server database, the Azure SQL Database service or even a SQL Server hosted in an Azure Virtual Machine. It is, however, worth noting that you can only export to a local file, you can’t export to Azure Blob Storage directly.
Uploading BACPAC Files to Azure Blob Storage
Once you have the BACPAC file, it’s easy to use the Azure SDK (in this case the 2.0 release) to upload it to Azure Blob Storage:
var storageAccount = CloudStorageAccount.Parse( azureStorageConnectionString );

var blobClient = storageAccount.CreateCloudBlobClient();

var backupContainer = blobClient.GetContainerReference( backupContainerName );

backupContainer.CreateIfNotExists();

var backupBlob = backupContainer.GetBlockBlobReference( backupBlobName );

using( var uploadStream = File.OpenRead( destinationFilePath ) )

{

  backupBlob.UploadFromStream( uploadStream );

}
Error checking and logging has been omitted from the above snippet, but these are essentially the steps needed.
The Complete Solution
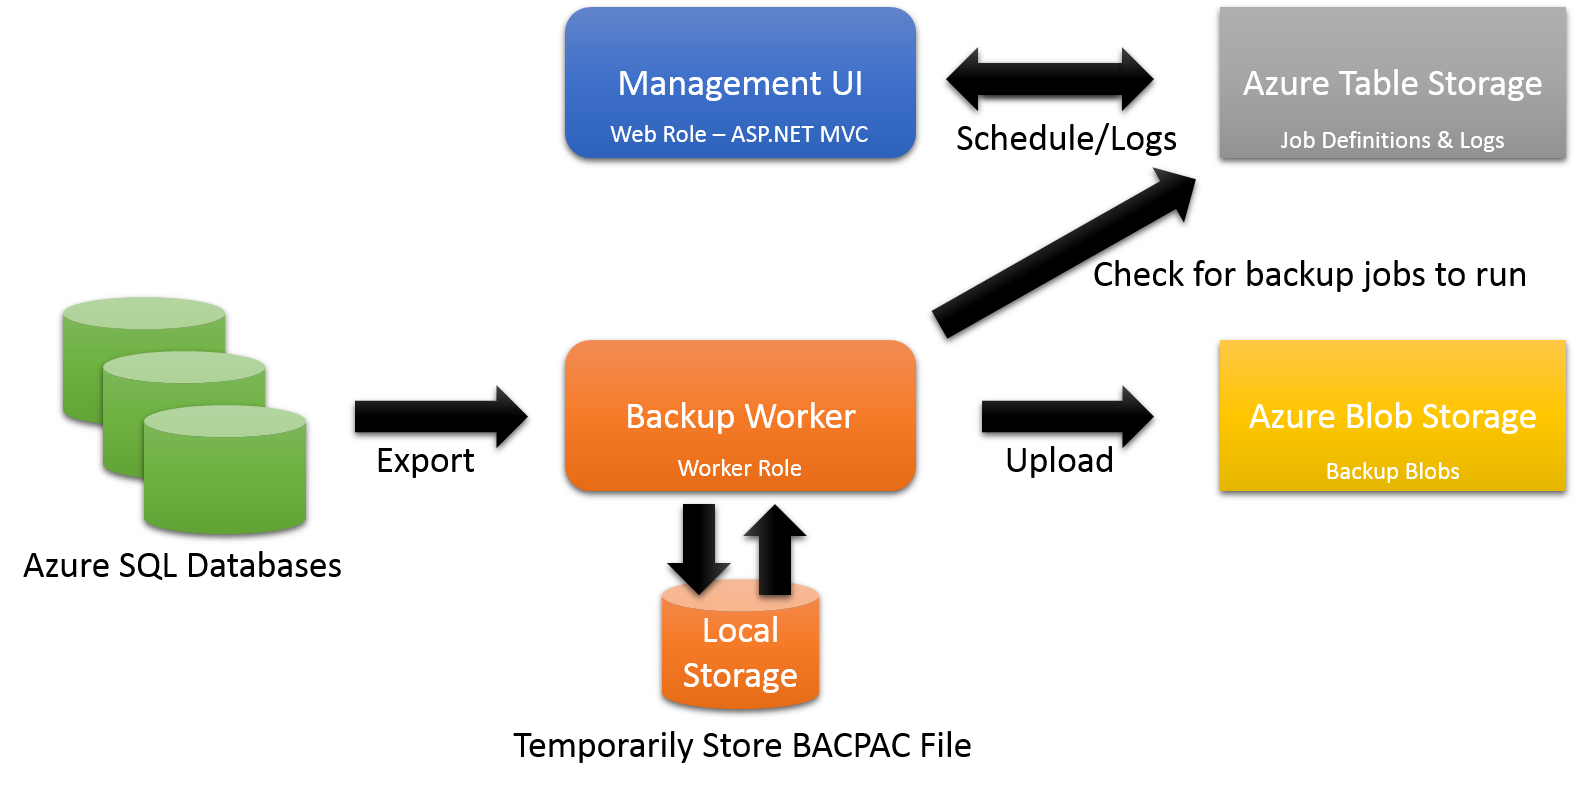
We built a very quick internal tool to wrap this with a simple management UI where you can manage backup jobs and view the logs of past jobs:
Figure 3 The overall solution architecture
Management UI
The management UI runs in in a Web Role and accesses Azure Table Storage to get the list of configured backup jobs and the logs associated with those jobs. The application uses the simple role and membership providers to ensure that only properly authenticated and authorized users can access the backup job information.
The structure for storing the backup job definitions in Azure Table Storage is very simple:
| Column | Description |
|---|---|
| PartitionKey | The name of the SQL Server |
| RowKey | The name of the database |
| DbConnectionString | The connection string for the database to backup |
| StorageConnectionString | The connection string for the Azure Storage account where the backup blobs should be stored |
| DayFrequency | The interval at which the job should be run |
| NexJobStart | The date/time the job should be run next |
| LastJobSucceeded | Did the last backup job succeed? |
| LastJobld | The id of the last executed job |
As you can see, there are some obvious issues with this scheme that would need to be addressed in a production solution:
- Given the partition key/row key approach you can only define one backup job per database
- The database connection string is currently stored in clear text, it should be encrypted to avoid revealing sensitive information (the same is true for the Azure Storage connection string)
The LastJobId column is used to make it easy for the management UI to look up the logs from the last time the backup job was executed in the table that holds the logging data:
| Column | Description |
|---|---|
| PartitionKey | The job id |
| RowKey | The log message index (i.e. 1 for the first message, 2 for the second, etc), stored as a padded string 000001, 000002 and so on |
| MessageTimestamp | The date/time the message was logged |
| Message | The actual log message |
The job id uses a simple approach of concatenating the SQL Server name, the database name and a time stamp.
Backup Worker
The backup worker runs as a Worker Role and performs most of the work with the overall cycle being:
- Wake up to check if it’s time to run any of the configured backup jobs
- If a job should be run, export the BACPAC file to local storage attached to the worker role (remember that the Microsoft.SqlServer.Dac.DacServices class can only work with an actual file path). Note that local storage is transient which means it’s good for temporary storage like this, but not suitable for storing data permanently.
- Once the BACPAC file has been created, upload it as a blob to the Azure Storage account associated with the backup job (it’s possible to use different storage accounts for different jobs)
- Delete BACPAC file from local storage after the upload is complete
- Update the backup job information with the result of the operation and a pointer to the logs for the backup
- Check if any other backup job should be run, otherwise go to sleep and return to step 1


