Summary
In this part we will add actual support for creating tasks in the application using LocalDB in our local development environment and separate Azure SQL databases on our Development and Production web sites. Being able to separate out the environments like this means developers can safely to changes locally without interfering with each other, deployments can be done to the Development site for testing purposes (without impacting the Production site) and once the application is deemed ready it can be deployed to the Production site.
Prerequisites
You will need to have these resources already configured:
- An Azure account, you can sign up for a free trial here.
- A Team Foundation Service account, it’s free and you can sign up here.
- Visual Studio 2012 (you can also use 2010).
- The Azure SDK, download here.
- TFS Power Tools for Visual Studio, download here.
It’s also helpful if you’ve followed all of the steps from parts one and two of this post where all the preparation for the steps in this part of the post.
Add Support for Adding To-Do Items
We’re going to add very basic support for creating to-do items and storing them in a SQL database. Using SQL Server for what we’re doing in this application is overkill, but we’re using it to demonstrate the basic technique.
Create the Data Project
We will be using Entity Framework (EF) to work with the to-do items. Start Visual Studio and open the ToDo solution from the Main branch. Right-click the solution node in the Solution Explorer window and select Add | New Project from the context menu.
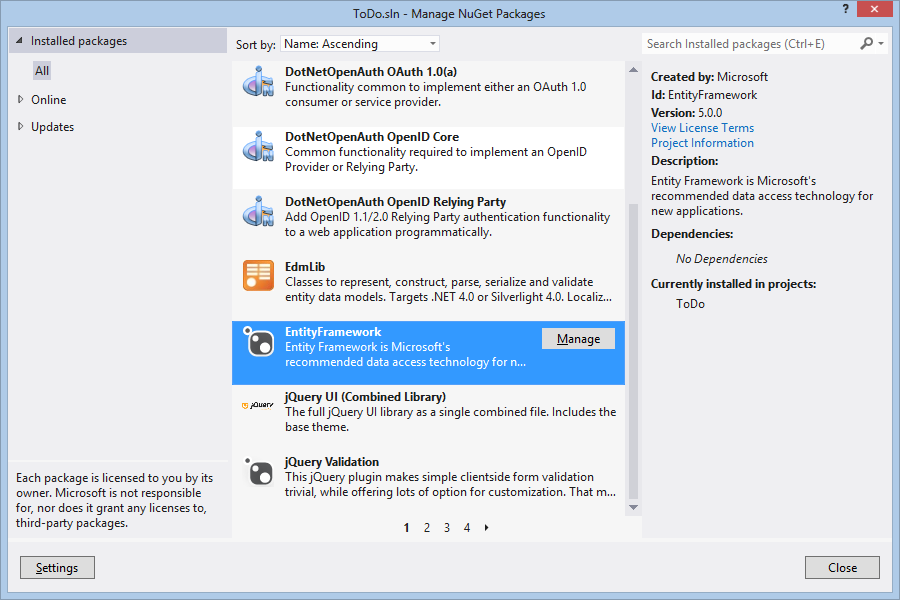
In the Add New Project dialog, select to create a Class Library project, naming it ToDo.Data. The new project isn’t yet configured to use EF so go to Tools | Library Package Manager | Manage NuGet Packages for Solution. In the NuGet Packages dialog, select the All node under Installed packages and scroll down in the list until you see the EntityFramework package:
Figure 1 The NuGet Package Management dialog
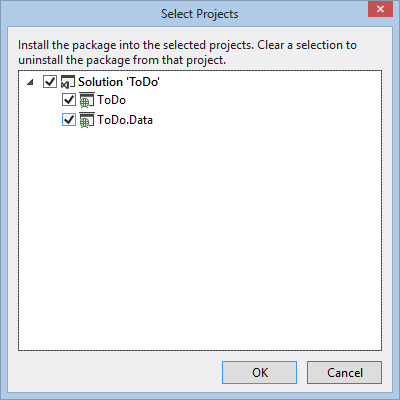
Click the Manage button for the EntityFramework package. This displays a dialog that lets you add the EF package to the ToDo.Data project:
Figure 2 Adding the Entity Framework package to the ToDo.Data project
Click the OK button to add the package, wait while Visual Studio adds the package and then close the NuGet Packages dialog.
Add The ToDoItem Entity
Delete the Class1.cs file that Visual Studio added to the ToDo.Data project, right-click the ToDo.Data project and select Add | Class from the context menu. Name the file ToDoItem.cs. Replace the default contents of the new file with this code:
using System;
using System.Collections.Generic;
using System.ComponentModel.DataAnnotations;
using System.Linq;
using System.Text;
using System.Threading.Tasks;

namespace Publish.Data
{
    public class ToDoItem
    {
        [Key]
        public int Id { get; set; }

        public string Title { get; set; }

        public string Description { get; set; }

        public DateTime DueDate { get; set; }
    }
}
Next, add one more class to the ToDo.Data project and name it ToDoContext.cs and replace the contents of it with this code:
using System;
using System.Collections.Generic;
using System.Data.Entity;
using System.Linq;
using System.Text;
using System.Threading.Tasks;

namespace Publish.Data
{
    public class ToDoContext : DbContext
    {
        public DbSet<ToDoItem> ToDoItems { get; set; }
    }
}
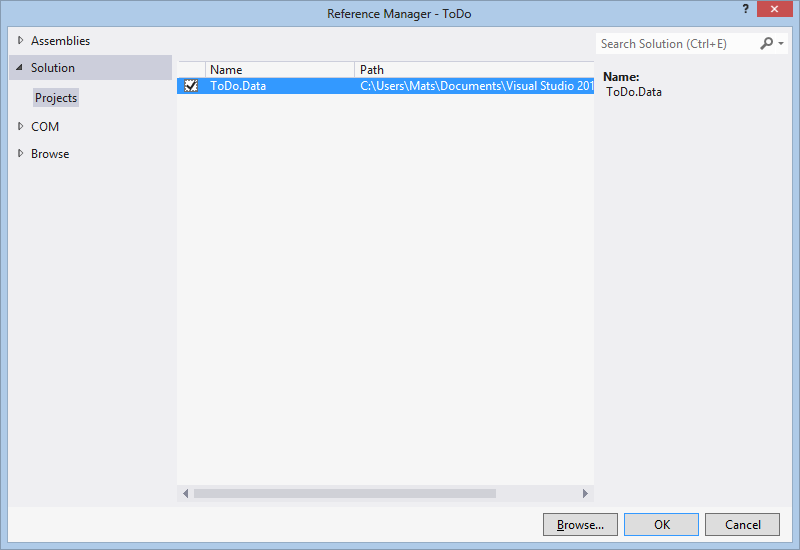
Finally, add a reference to ToDo.Data in the ToDo project by right-clicking the ToDo project and selecting Add Reference from the context menu. In the Reference Manager dialog, select Solution on the left and then check the ToDo.Data project and click OK:
Figure 3 Adding the reference to the ToDo.Data project
Configuring Entity Framework
The Entity Framework needs to be told which database to use. With Visual Studio 2012, LocalDB is a convenient option for local development use. In the ToDo project, open up web.config and in the section, copy the existing connection string and change the copy so the ` section looks like this:
<connectionStrings>
    <add name="DefaultConnection" connectionString="Data Source=(LocalDb)\v11.0;Initial Catalog=aspnet-ToDo-20130702090041;Integrated Security=SSPI;AttachDBFilename=|DataDirectory|\aspnet-ToDo-20130702090041.mdf" providerName="System.Data.SqlClient" />
    <add name="ToDoContext" connectionString="Data Source=(LocalDb)\v11.0;Initial Catalog=aspnet-ToDo-Items;Integrated Security=SSPI;AttachDBFilename=|DataDirectory|\aspnet-ToDo-Items.mdf" providerName="System.Data.SqlClient" />
</connectionStrings>
Add Support for Seeing the List of Tasks
In the ToDo project, open HomeController.cs and change the Index() method to look like this:
public ActionResult Index()
{
    ViewBag.Message = "Here you can see and create tasks.";

    List<ToDoItem> tasks;

    using ( var context = new ToDoContext() )
    {
        tasks = context.ToDoItems.ToList();
    }

    return View( tasks );
}
Next, open Index.cshtml in the Views | Home folder and change it to look like this:
@model IEnumerable<ToDo.Data.ToDoItem>

@{
    ViewBag.Title = "Home Page";
}
@section featured {
    <section class="featured">
        <div class="content-wrapper">
            <hgroup class="title">
                <h1>@ViewBag.Title.</h1>
                <h2>@ViewBag.Message</h2>
            </hgroup>
            <p>
                Welcome to my To Do application
            </p>
        </div>
    </section>
}

<h2>Tasks</h2>

<p>
    @Html.ActionLink("Create Task", "Create")
</p>
<table>
    <tr>
        <th>
            @Html.DisplayNameFor(model => model.Title)
        </th>
        <th>
            @Html.DisplayNameFor(model => model.Description)
        </th>
        <th>
            @Html.DisplayNameFor(model => model.DueDate)
        </th>
    </tr>

@foreach (var item in Model) {
    <tr>
        <td>
            @Html.DisplayFor(modelItem => item.Title)
        </td>
        <td>
            @Html.DisplayFor(modelItem => item.Description)
        </td>
        <td>
            @Html.DisplayFor(modelItem => item.DueDate)
        </td>
    </tr>
}

</table>
Add Support for Creating Tasks
Seeing the list of tasks isn’t very helpful unless we have a way to create tasks. Go back to `HomeController.cs and add these two methods:
public ActionResult Create()
{
    return View();
}

[HttpPost]
public ActionResult Create( ToDoItem item )
{
    using ( var context = new ToDoContext() )
    {
        context.ToDoItems.Add( item );
        context.SaveChanges();
    }

    return RedirectToAction( "Index" );
}
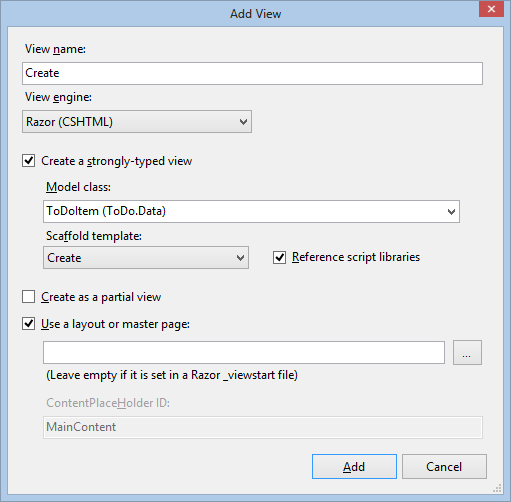
Next, right-click inside the parameter-less Create() method and select Add View from the context menu. In the Add View method, create a strongly-typed view for the ToDoItem class using the Create scaffolding template:
Figure 4 Adding the create view
Click Add to create the file Create.cshtml in the Views | Home folder.
Run and Test the Application Locally
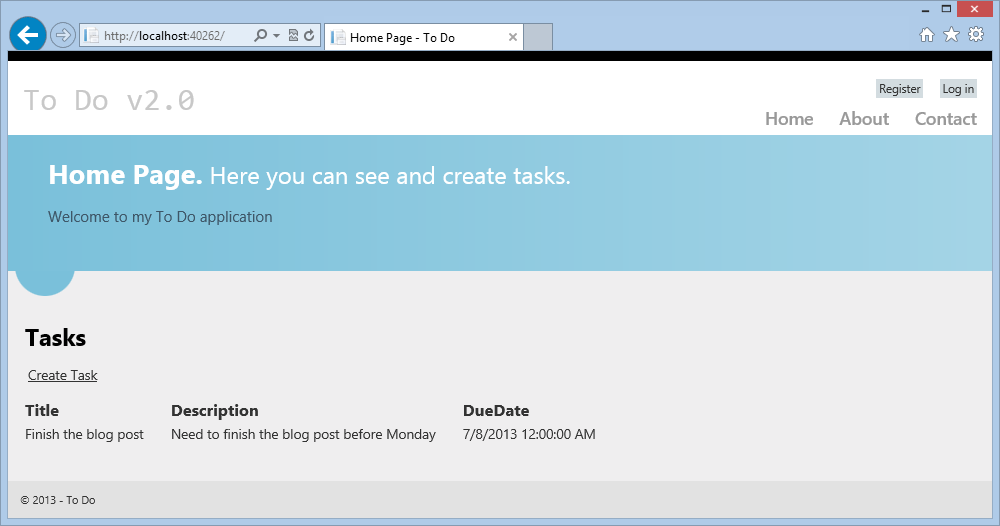
We now have all the basic functionality in place for the application, press F5 to build and run the application and verify that you can create tasks and see them in the list of tasks on the home page:
Figure 5 The completed application
Configure Support for Development Web Site
At this point we have everything running locally, but in order to deploy the updated application to Azure we’ll need to switch to using SQL Server as LocalDB isn’t supported with Azure Web Sites.
Create the Development Database
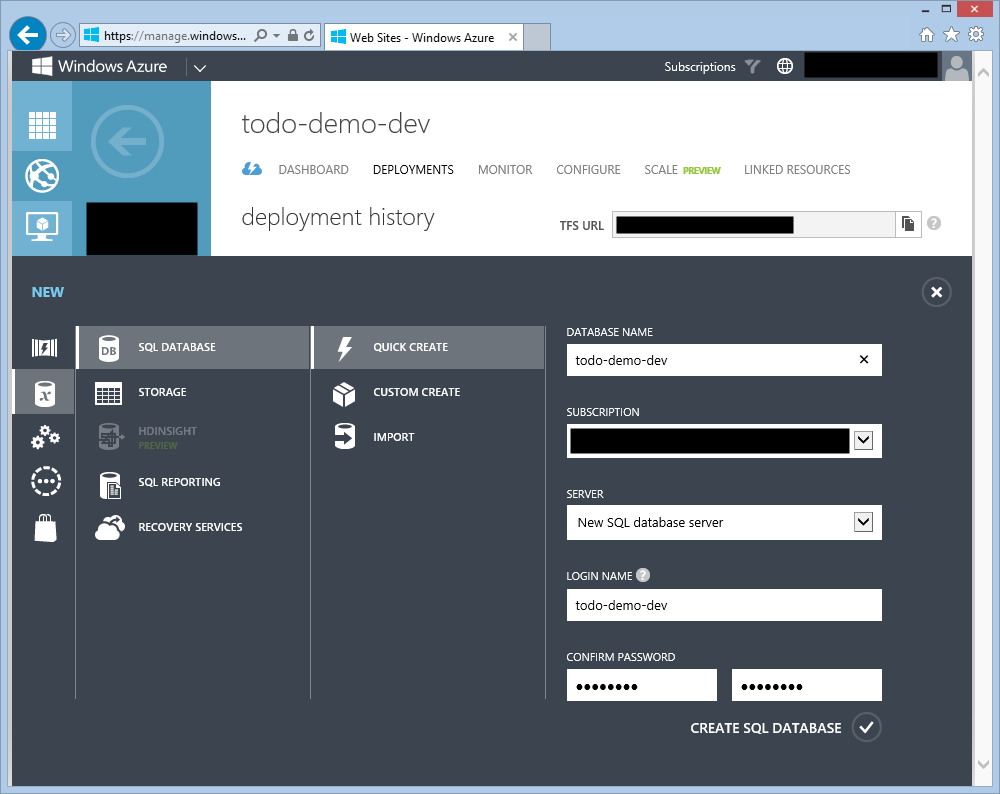
Go to the Azure Management portal and create a new SQL Server database by clicking the plus sign in the lower left corner and then Data Services | SQL Database | Quick Create:
Figure 6 Creating a SQL Database for the development site
Since we’re creating the SQL Database for the development environment we’ll name it todo-demo-dev to make it obvious what the database is being used for. Make sure to take note of the login name and password you specify here as we’ll need them later. Click the check mark to create the database, this typically takes a few minutes.
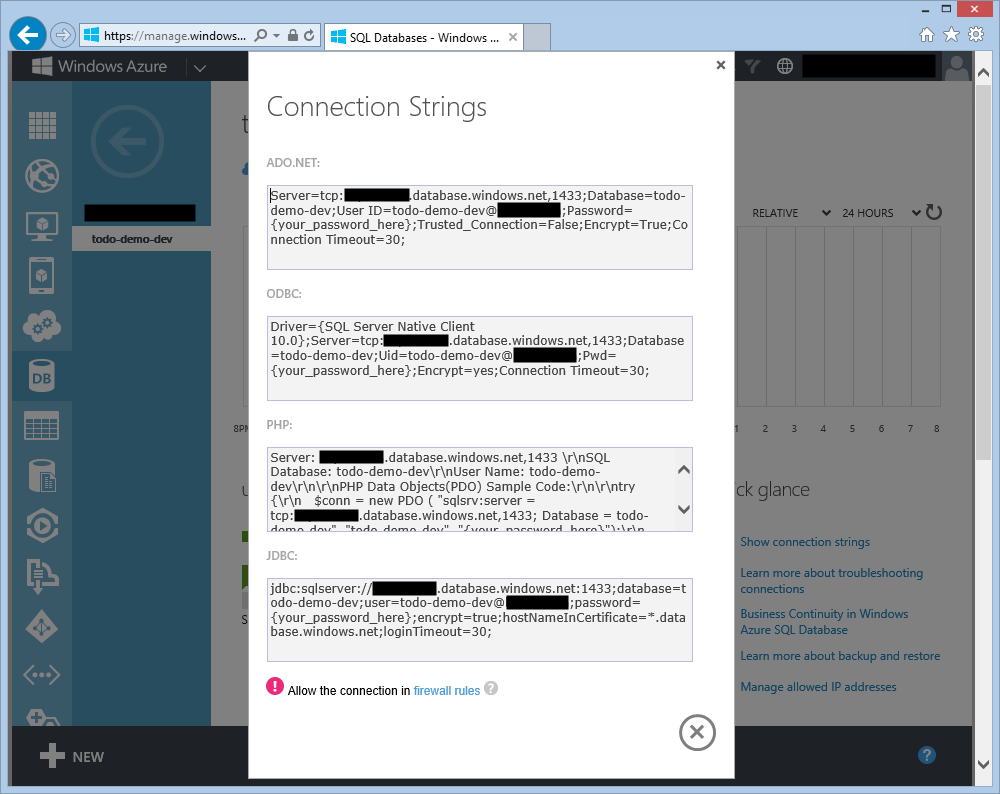
Once the database has been created, go to the SQL Databases section of the Azure Management portal and click the name of the database to get to the dashboard tab. In the quick glance section, click the Show connection strings link to get the connection string we’ll need when deploying to the development web site:
Figure 7 The development database connection strings
Copy the ADO.NET connection string as this is the connection string we will be using in our application.
Configure Database Support for Deployments to the Development Site
The database connection string the application should use is defined in the web.config file associated with the application. The standard version of the web.config file in the project uses our local database so we need a way to change the web.config file when the application is deployed to the development environment. Visual Studio supports the concept of transforming the web.config file for different deployments that fits this need.
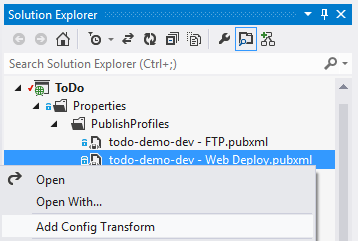
In Visual Studio, go to the Solution Explorer window and expand the ToDo | Properties | PublishProfiles folder where the publish profiles are located. Right-click the todo-demo-dev – Web Deploy.pubxml file and select Add Config Transform from the context menu:
Figure 8 Adding a config transform for the development web site
Visual Studio creates and opens the config transform file that includes an example for how to change a connection string. We’ll follow that example and add the connection string for the Azure SQL Database we created above:
<?xml version="1.0" encoding="utf-8"?>

<!-- For more information on using web.config transformation visit https://go.microsoft.com/fwlink/?LinkId=125889 -->

<configuration xmlns:xdt="https://schemas.microsoft.com/XML-Document-Transform">
  <connectionStrings>
    <add name="ToDoContext"
      connectionString="Server=tcp:myservername.database.windows.net,1433;Database=todo-demo-dev;User ID=todo-demo-dev@bsptsz1cfn;Password=mypassword;Trusted_Connection=False;Encrypt=True;Connection Timeout=30;"
  xdt:Transform="SetAttributes" xdt:Locator="Match(name)"/>
  </connectionStrings>
  <system.web>
    <compilation xdt:Transform="RemoveAttributes(debug)" />
  </system.web>
</configuration>
Note that you will need to specify the name of your database server, user name and password you used when you created your database.
Check in the Changes and Test the Deployment
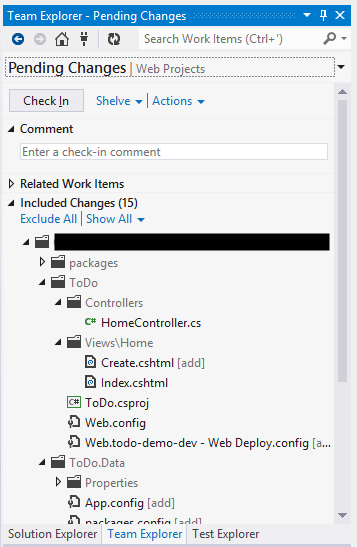
We’re now ready to check in all of our changes and trigger a build and deployment to the development web site:
Figure 9 Checking in the changes made in the Main branch and triggering the build and deployment
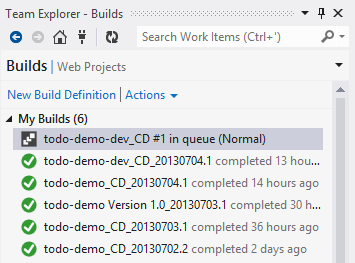
After checking in the changes, go to the Builds section of the Team Explorer window and see that the build has been triggered:
Figure 10 Build triggered by the check-in
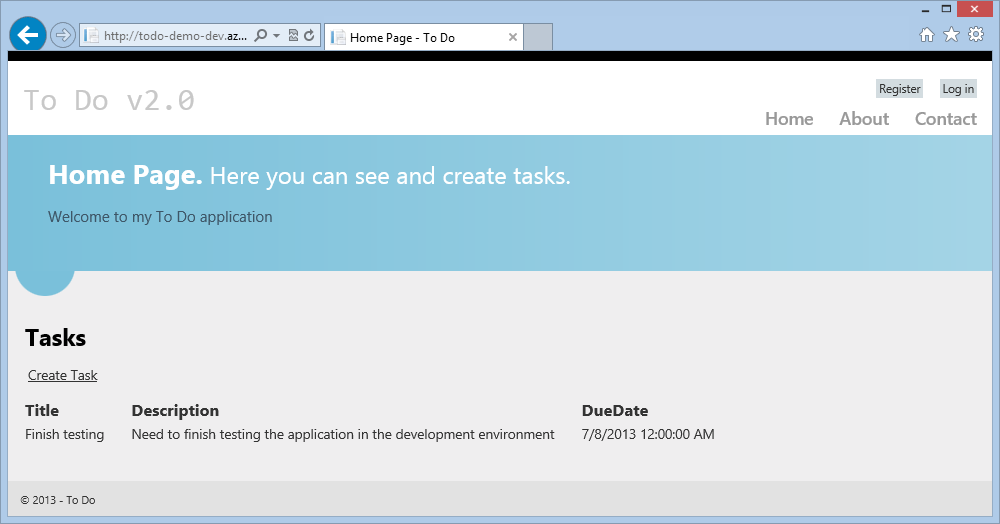
Once the build completes you can open up the development web site and see that the application has been deployed and is running against the development database:
Figure 11 The application running in the development environment
Configure Support for Production Web Site
Once we get to the point where we’re getting ready to deploy version 2.0 of the application to the production site we’ll use the same steps as in part two of this post along with creating a production database:
- Create a Version 2.0 branch from the Main branch
- Create the production database in the Azure Management portal and copy the connection string
- Open the ToDo solution from the Version 2.0 branch and create a config transform for the production environment publish profile (todo-demo – Web Deploy.pubxml)
- Add the production database connection string to the new config transform and check it in
- Clone the Version 1.0 build definition and update it to build the solution from the Version 2.0 branch along with using the production web site publish profile from the Version 2.0 branch
Once these steps have been completed you can use the new build definition to build and deploy the application to the production environment.


