Summary
Windows 8.1 Pro is a new operating system from Microsoft that re-imagines how, where, and what users expect from a computer. There are so many additions to the way users interact with this new platform that it can seem like a daunting challenge to take advantage of all the new features it has to offer. Fortunately with a little time and perseverance users can find nice ways to customize the experience.
Prerequisites
Windows 8.1 Pro
Getting Started with a Few Settings
#1 Don’t Panic!
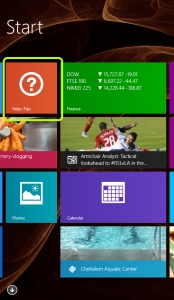
When you use Windows 8.1 Pro for the first time it can be disorienting even for seasoned developers. The first thing you should do is open the Help+Tips app. It is a very basic visual aid that can help orient you to the environment.
As soon as you start the Help+Tips app it will fill the screen. Unsurprisingly, the next thing you need to know is how to close a full screen app. Click on the “Getting Around” rectangle. Scroll to the right and you will see how to close full screen apps.
Here’s how: If you have a touch screen you can touch the top, hold and swipe to the bottom of the screen. There will be an animation to resize the app and finally to send it off the screen. This closes the app. With a mouse you can grab, or left-click, the top of the app in the same manner. A swipe and drag motion from the top of the screen to the bottom closes a full screen app.
There is another way to close full screen apps. You can move a mouse cursor up to the top-left corner of the screen and when a list of thumbnails appears, hover over the app’s thumb, then right-click, then choose “Close”.
The last way to close a Modern App is to use the familiar Task Manager. (see “Get to the Desktop” below). Simply navigate to your Desktop and right-click the Taskbar to select Task Manager. Ctrl+Alt+Delete also still works to bring up a menu with Task Manager in it. Open Task Manager, select the app or process you want to stop and click End Task.
Spend some time using the Help+Tips app to find out more things you can do.
#2 Get to the Desktop
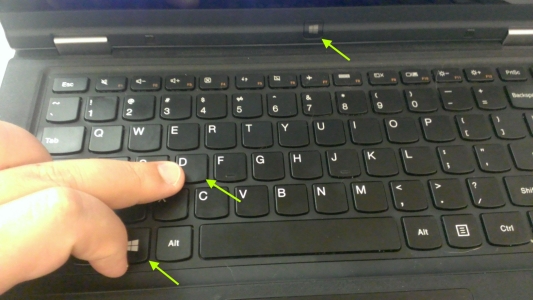
Use the Windows key on your keyboard with the D key. Voila! There is your Desktop. There is also a Desktop tile on the Start screen. You can click that to go to the Desktop. If you have a Windows hardware button on your tablet or laptop, you can press that multiple times to alternate between the Desktop and the Start screen. Again, the Help+Tips app has some of this information if you want to read more.
#3 Launching to the Desktop First
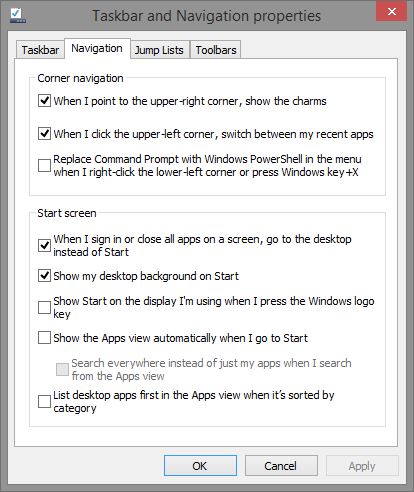
Developers typically require Desktop applications to write software. The default settings for Windows 8.1 Pro will show the Start screen first after logging in. You can easily change this to start in the Desktop first. Go to the Desktop. Then right-click with a mouse (press and hold for touch screen) on the Taskbar. Select Properties from the context menu. Select the Navigation tab. Then check off “When I sign in or close all apps on a screen, go to the desktop instead of Start”.
#4 Other Settings
Before you close the dialog, look at the option to “Show my desktop background on Start”. The Desktop background will be copied to your Start screen. This actually makes the transition from Start to Desktop much nicer and less jarring. And all the cool kids are doing it.
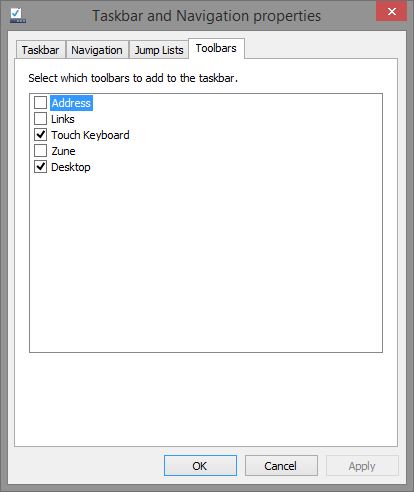
To get another quick access shortcut to the Control Panel or other system items on your TaskBar you can do the following. From the Taskbar and Navigation properties dialog, go to the Toolbars tab and check off the Desktop option.
You will see an item labeled “Desktop” with two little chevrons on your Taskbar that when clicked will show a list of shortcuts to just about everything you can find using Windows Explorer. This is a convenient place to put a shortcut of folders since, as a developer, you are likely to spend more time in the Desktop screen than in the Start screen.
Click Ok, or Apply to save the settings and close the dialog.
#5 100% is Best
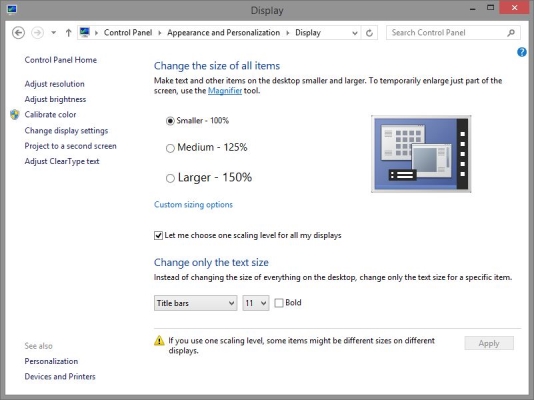
In my experience the default setting for scaling screen items is not optimal for productive work. By default, the scaling level for all displays is set to 125%. You can change this to 100%. Which is similar to the process of zooming out to a normal zoom level. Right-click on the Desktop and choose “Screen resolution”. Locate and click on the link text that reads, “Make text and other items larger or smaller”. Tick the box next to, “Let me choose one scaling level for all my displays”. And finally, click the radio circle next to “Smaller – 100%”.
Click Apply and follow the prompts to sign out and sign back in so the setting can change.


